Products
Solutions
Resources
9977 N 90th Street, Suite 250 Scottsdale, AZ 85258 | 1-800-637-7496
© 2024 InEight, Inc. All Rights Reserved | Privacy Statement | Terms of Service | Cookie Policy | Do not sell/share my information

In the master data libraries operational resources, employee, equipment and material resources are organized and stored for use in the InEight cloud platform. These resources should not be confused with the Estimate Resources stored in the Project library of InEight Control, which might also be used in your project. To clarify, note the following definitions of estimating resources and operational resources for project resources.
|
Term |
Definition |
|---|---|
|
Estimating Resources |
The generic resources used to estimate work for the project. For example:
These are typically imported from InEight Estimate, but additional generic resources can be added in Control as needed for additional work such as for change orders. Estimate resources are not accessed from the Master data libraries menu. They are accessed at the project level in the Control application (Control > Project library). |
|
Operational Resources |
The specific employee, equipment, and material used to build the work on the project and tracked in Plan and Progress. For example:
If you have the applicable role, you can add operational resources to specific projects. Currently, you can only add employee and equipment operational resources to the project but not materials. |
The following diagram illustrates the difference between estimating and operational resources.

For employee and equipment, there are three tiers to each of the operational resources as shown below.
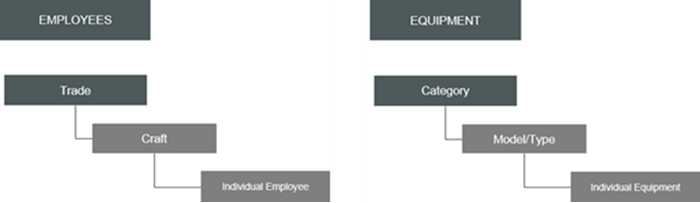
Below it shows examples for each tier of an employee and equipment resource.

In the master data library, employee operational resource hierarchy is organized into three levels for trade, craft, and employee. Employee operational resources are used in these InEight applications: Billings, Compliance, Completions, Plan, and Progress (Time Center).
|
Employee Operational Resources Hierarchy |
|
|---|---|
|
Term |
Definition |
|
Trade |
Top layer of the employee operational resource entity, traditionally used as a method to organize crafts into operational or functional areas within a company’s structure. An example of a trade would be Electricians. |
|
Craft |
Assigned to a trade, traditionally used to define a level or category of employees with metadata details including ID, description, union, and vendor as well as cost metadata including currency, unit of measure (UoM), and pay rates (standard, overtime, and double time). An example of a craft would be Apprentice Electrician. |
|
Employee |
Assigned to a craft, traditionally defines the actual named employee with all required metadata including the employee’s ID, name, global start and end dates, job title, etc. In addition, this would include the individual employee’s pay rates, which are initially inherited from the craft that the employee is assigned to. |
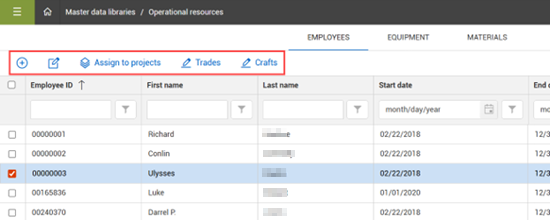
To manage employee operational resources, go to Main menu > Master data libraries > Operational resources. The page opens to the Employees tab.
From the Employees page left toolbar, you can do the following:
Add and edit employee records
Manage trade and craft values
Assign employees to projects
From the right toolbar, you can:
Set a toggle to show all employees or hide employees that have an expired end date.
Import and export employee records via Microsoft Excel template by selecting the Import and Export icons.
Select the Show information details icon to open a slide-out panel with details for the selected employee, without having to open the employee record.
With a potentially high number of employee records, click the Search icon to help you quickly find an employee record.

To manage the list of trades on the Employees page, click the Trades icon to open the Manage trades dialog box. In the Manage trades dialog box, click the Add trade icon to add new trades. When you create a new trade, you can set the status to either Unavailable or Available. You can edit the trade ID, description, and status directly in their respective fields in the Manage trades dialog box. Use the toggle in the right toolbar, to show or hide unavailable trades.
Click the Crafts icon to open the Manage crafts page. Similar to the Employees page, the Crafts page has left and right toolbars for adding, editing, importing, exporting and hiding unavailable crafts.
Click the Add craft or Edit craft icons to open the Crafts dialog box, which has tabs for defining craft details and costs.
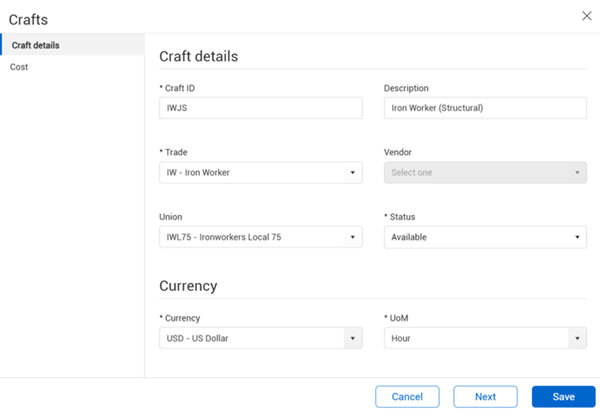
In Craft details, you must define the craft ID, the associated trade, the status, currency, and UoM. If a vendor or union are specified for the craft, any employees assigned to the craft will inherit those values.
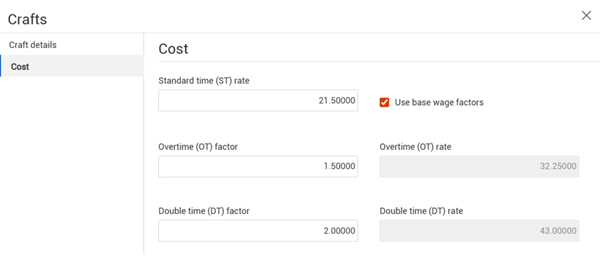
The Cost tab includes a standard rate that you can enter for the craft, which is applied to the employees assigned to the craft. You can also select the Use base wage factors check box to specify factors for calculating overtime and double time.
From the Employees page, when you select to add a new employee or edit an existing employee it opens a dialog box on the page. There are multiple tabs in the employee dialog box that are organized to help you find specific employee information.
The Details tab includes specific employee information, such as employee ID, first and last name, and the employee’s start and end date. Employees are only available, for example to use on a daily plan in InEight Progress, if that date that within their start and end date. The Union and Vendor fields are read-only, which are inherited from the craft. These fields can be used for tracking payroll when collecting hours from the field.
On the tab you can also specify job details, including job title and union job title. In the Job details section, you can also specify a supervisor for the employee. If your organization requires supervisor approval of time cards before they are submitted to payroll, those employees must have a supervisor assigned to them.
The Details tab includes the option to add a PIN for the employee, which is necessary if your organization requires a PIN for employees to sign out on daily plans in Progress.
On the Rates tab, you can enter standard time (ST), overtime (OT), and double time (DT) rates, which are used by Progress for understanding productivity, estimated actuals in Control, and for use on some InEight reports. These rates can be inherited from the craft level, or you can override the craft rates, which allows you to have different employee rates from project to project.
See Employee Rate Inheritance for more information about rates.
The Time reporting tab shows these three toggles that are used for time reporting options:
Employee available for selection in daily plan
Employee available for selection in weekly timesheet
Requires supervisor approval
If the Requires supervisor approval toggle is set to On, the employee must also have a supervisor assigned on the Details tab for it to be available for approval. This setting is only needed if the Supervisor approval required toggle is set to On in organization > Project settings.
Refer to Manage Time Cards > Supervisor Approval and Sign In/Sign Out for more information about time reporting.
Qualifications refer to any requirements for employees on a worksite such as a certification to operate a type of heavy equipment, or a certificate to perform on-site safety checks.
To add qualifications for an employee on the Qualifications tab, click the Add Qualification icon, and then select the applicable qualification from the drop-down list in the Name field. The list of available qualifications is stored in Master data libraries > Qualifications. You can also select a start date, expiration date, or indicate if the qualification does not expire.
Equipment operational resources are organized into a hierarchy by category, model or type, and piece of equipment. Equipment operational resources are used in these InEight applications: Billings, Compliance, Completions, Plan, and Progress (Time Center).
|
Equipment Operational Resources Hierarchy |
|
|---|---|
|
Term |
Definition |
|
Category |
Top level in the hierarchy of the equipment operational resource entity, used to organize your equipment at a high level such as trucks, excavators, cranes. |
|
Model/Type |
Assigned under categories and provides additional details to define equipment into a smaller sub group. Examples are, Crane RT 50-79 Ton, Crane RT 80-119 Ton. |
|
Equipment |
Represents the actual piece of equipment being used on the project. Includes the ID, description, ownership as either rented or owned and the unit cost. |
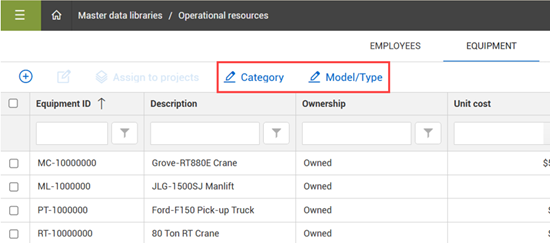
To manage equipment operational resources, go to Main menu > Master data libraries > Operational resources > Equipment. Like functionality used to manage employees is also applied to the operational resources Equipment page. Similar to employees, you can select the sub-level icons for Category and Model/Type to manage those levels.
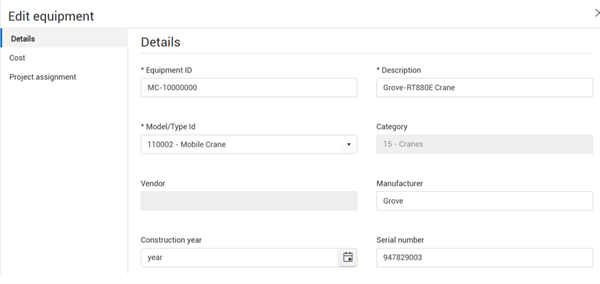
From the Equipment page, when you select to add new equipment or edit existing equipment it opens a dialog box on the page. There are multiple tabs in the equipment dialog box that are organized to help you find specific equipment information.
On the Details tab you can specify key information for the equipment including ID, description, manufacturer, year, serial number, and if the equipment is owned or rented. In the Status section on the page, you can provide a status for the availability and provide a location for the equipment.
On the cost tab, you can define the unit cost for the equipment and assign it to a cost center for tracking purposes. You can also define a standby unit cost to account for when the equipment is sitting idle versus when it is being operated.
You can assign employees and equipment resources to projects from the operational resources page in the master data library. Platform allows you to select one or more resources and assign them to a project or multiple projects from the Employee and Equipment pages or from the Edit employee and Edit equipment dialog boxes.
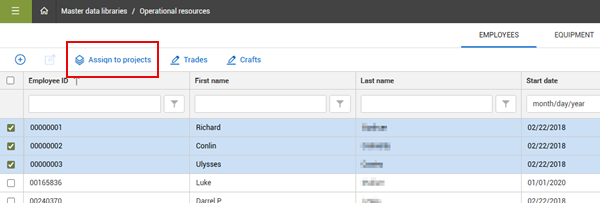
From either the Employee or Equipment page, you can select the resource or resources to assign, and then click the Assign to projects icon.
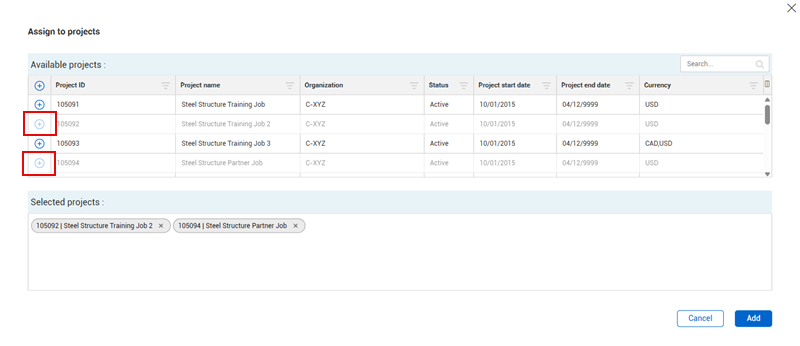
In the Assign to project dialog box, click the Add icon for a project in the list to select it to be assigned. You can use the Search field to find a specific project in the list. After you select a project, it shows in the Selected section of the dialog box. Click Add to complete the assignment.
When doing bulk assignments of many employees to many projects, a message shows when the operation is completed and if any errors have occurred. If an error occurs, click the Notifications icon at the top of the page to see the error details. For performance reasons, the bulk assignment of employees to projects is limited to 30,000 (n employees x n projects).
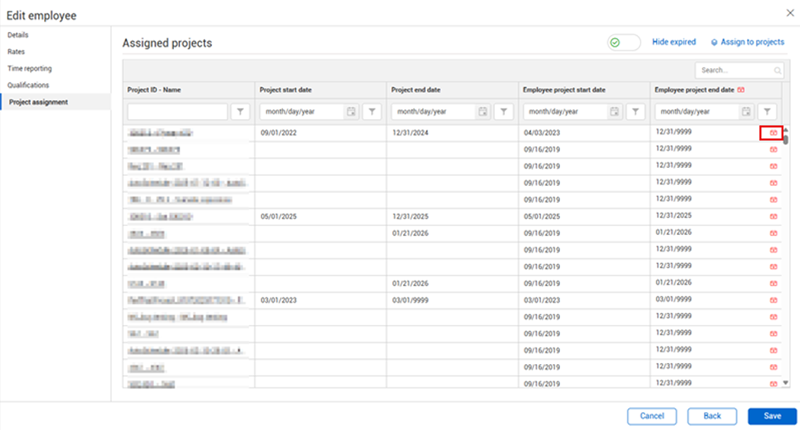
You can also assign individual resources to a project or projects by selecting the resource and clicking the Edit employee or Edit equipment icon. On the Project assignment tab of the Edit employee or Edit equipment dialog box, it shows a list of all the projects the employee or equipment is assigned to and allows you to quickly manage project start and end dates for the resource. On the Project assignment page, you can do the following for the selected employee:
Click the Expire now icon to set the project end date to today’s date and remove the resource from the project.
Click the Expire all now icon at the top of the column to remove the resource from all assigned projects.
Click the Assign to projects button to add the resource to another project or projects.
Click the project link to open the Assigned operational resources > Employees or Equipment page in a new tab, which is filtered to show the employee or equipment project details.
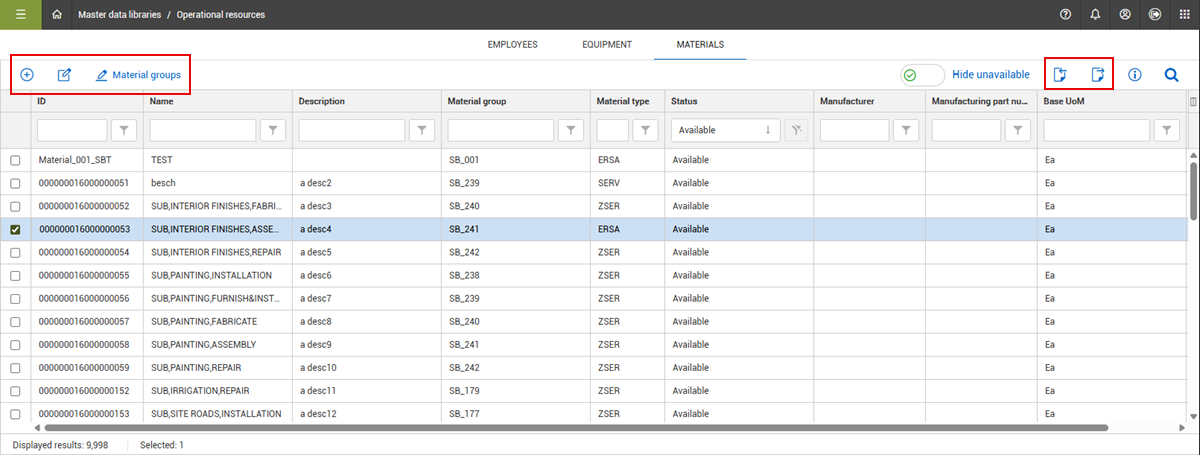
From the Materials tab, you can manage materials and material groups. The functionality for managing materials matches the same functions found on the Employee and Equipment tabs, including the ability to add, edit, export and import materials.
Additional Information
9977 N 90th Street, Suite 250 Scottsdale, AZ 85258 | 1-800-637-7496
© 2024 InEight, Inc. All Rights Reserved | Privacy Statement | Terms of Service | Cookie Policy | Do not sell/share my information